Stairwell remodel

Stair Remodel | Before & After

[AD: this post contains gifted items.]

Well, folks, it’s taken four months, plus every last shred of sanity I possess, but, at long last, I’m happy to say that our stair remodel is finally DONE.

Honestly, I think I’ve said more than enough about this particular project over the last few weeks months, so this time I’m just going to go straight to the photos, and let them do the talking: for those of you new to The Stair Saga, meanwhile, you can read part one of the story here, and my DIY diary here. Oh, and some tips on how to survive two solid months of DIY, too. Wow, I really HAVE been going on about this one, haven’t I? Well, here’s the finished result: and also my cheesy smile when I realised it was FINALLY done…

So! When we first started this project, back in the days when God was a teenager, and dinosaurs still roamed the earth, our downstairs hall looked like this:

downstairs hall, before stair remodel

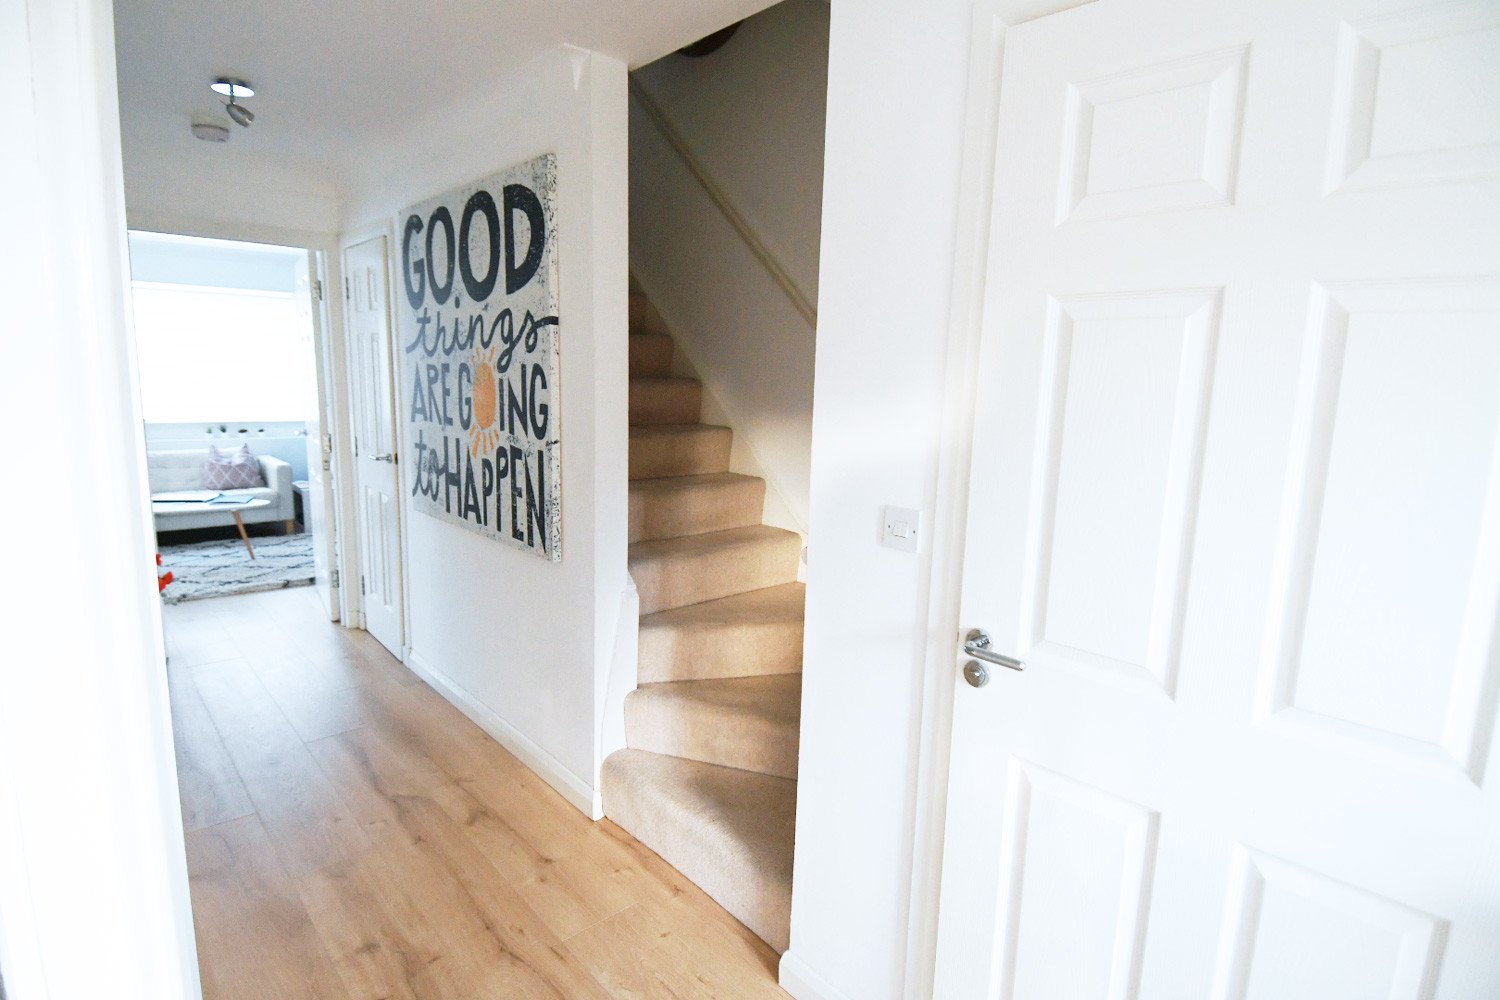
So, the stair was dark, dingy, fully enclosed, and with an old beige carpet that wasn’t quite as scruffy in real life as it looks in this photo, but which was pretty scruffy, to be totally honest. Good things were going to happen, though, apparently, and so it came to pass that just several lifetimes later, and at great cost to our combined mental health, that hall now looks like this:

hallway with glass walled staircase

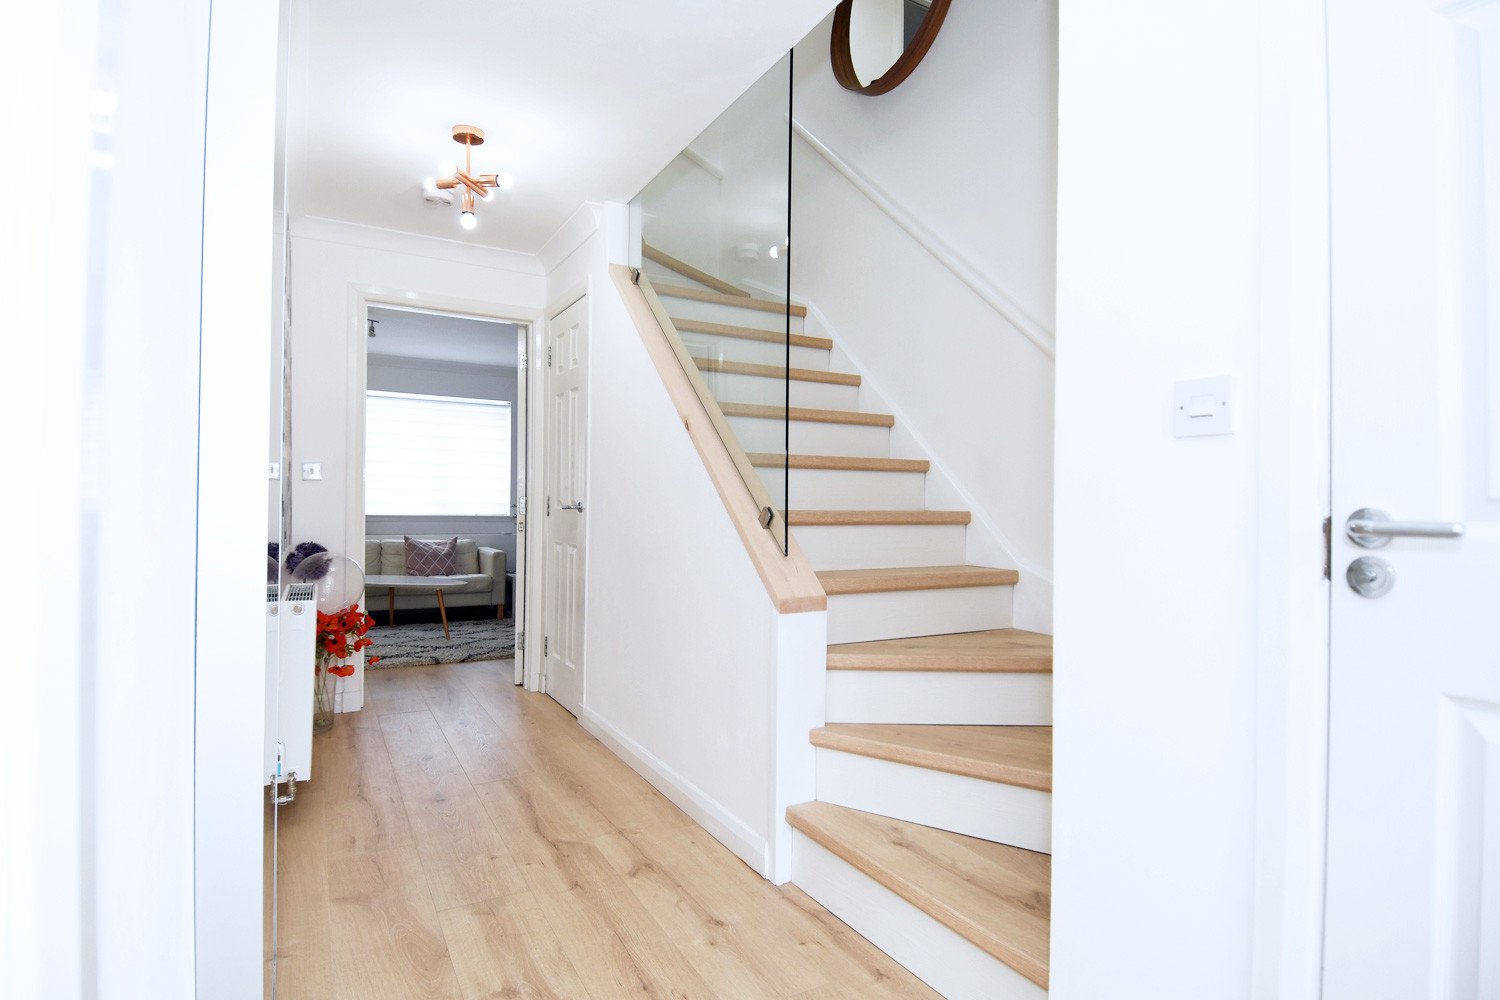
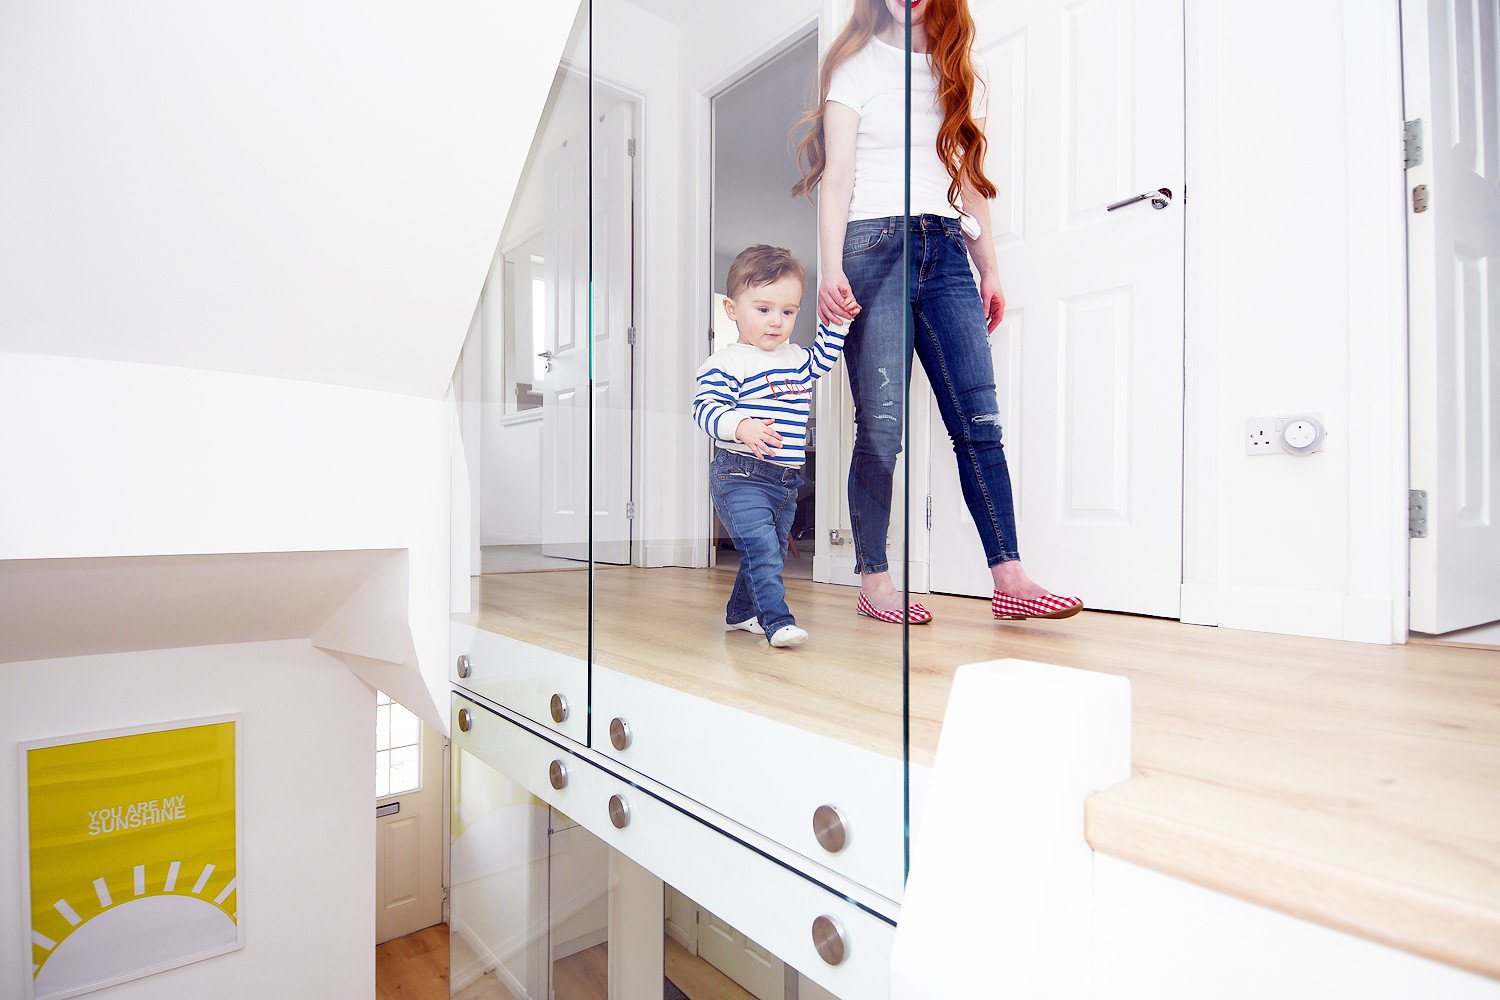
Oh, and don’t worry: good things are still going to happen – they’re just going to be happening on the opposite wall from now on:

Good Things are Going to Happen large canavas in modern home

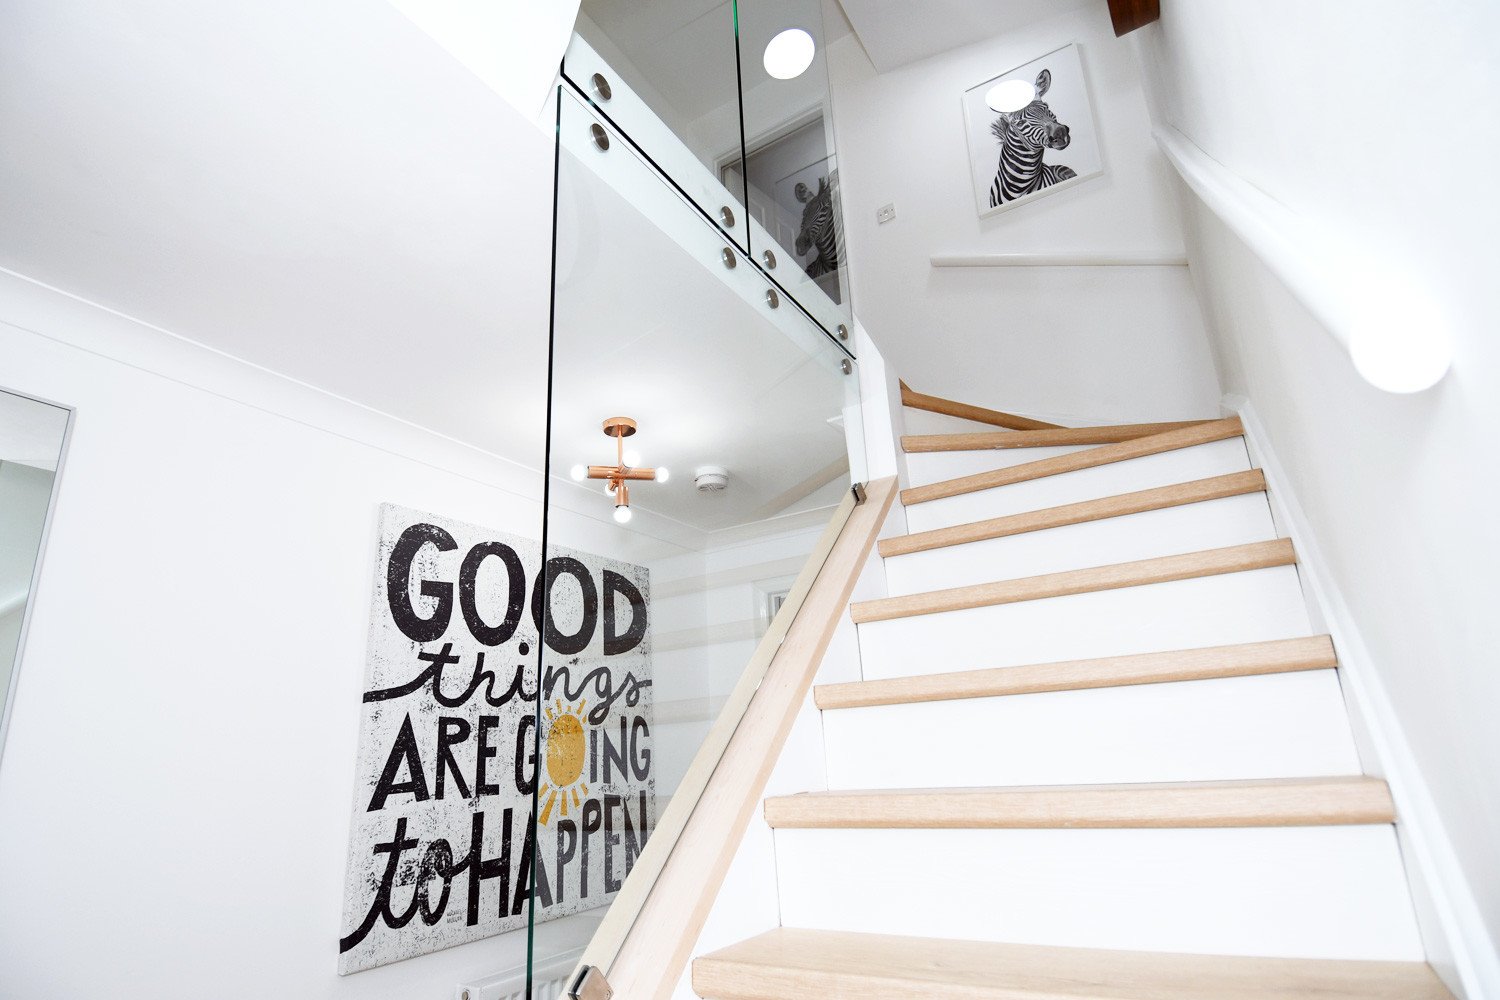
(The giant canvas was courtesy of Photowall Sweden a couple of years ago.)

Knocking down the wall was the first – and easiest – step here: it was finding something to replace it with that was the problem. We always knew we wanted to use reinforced glass here, to let in as much light as possible, but it proved a little bit tricky to find someone willing and able to provide it for us. Eventually, though, we found a local glazier who was able to help, and while we were waiting for the glass sections to be made and delivered, Terry cracked on with removing the carpet, and replacing it with laminate flooring:

minimal staircase with pale wood floor and glass wall

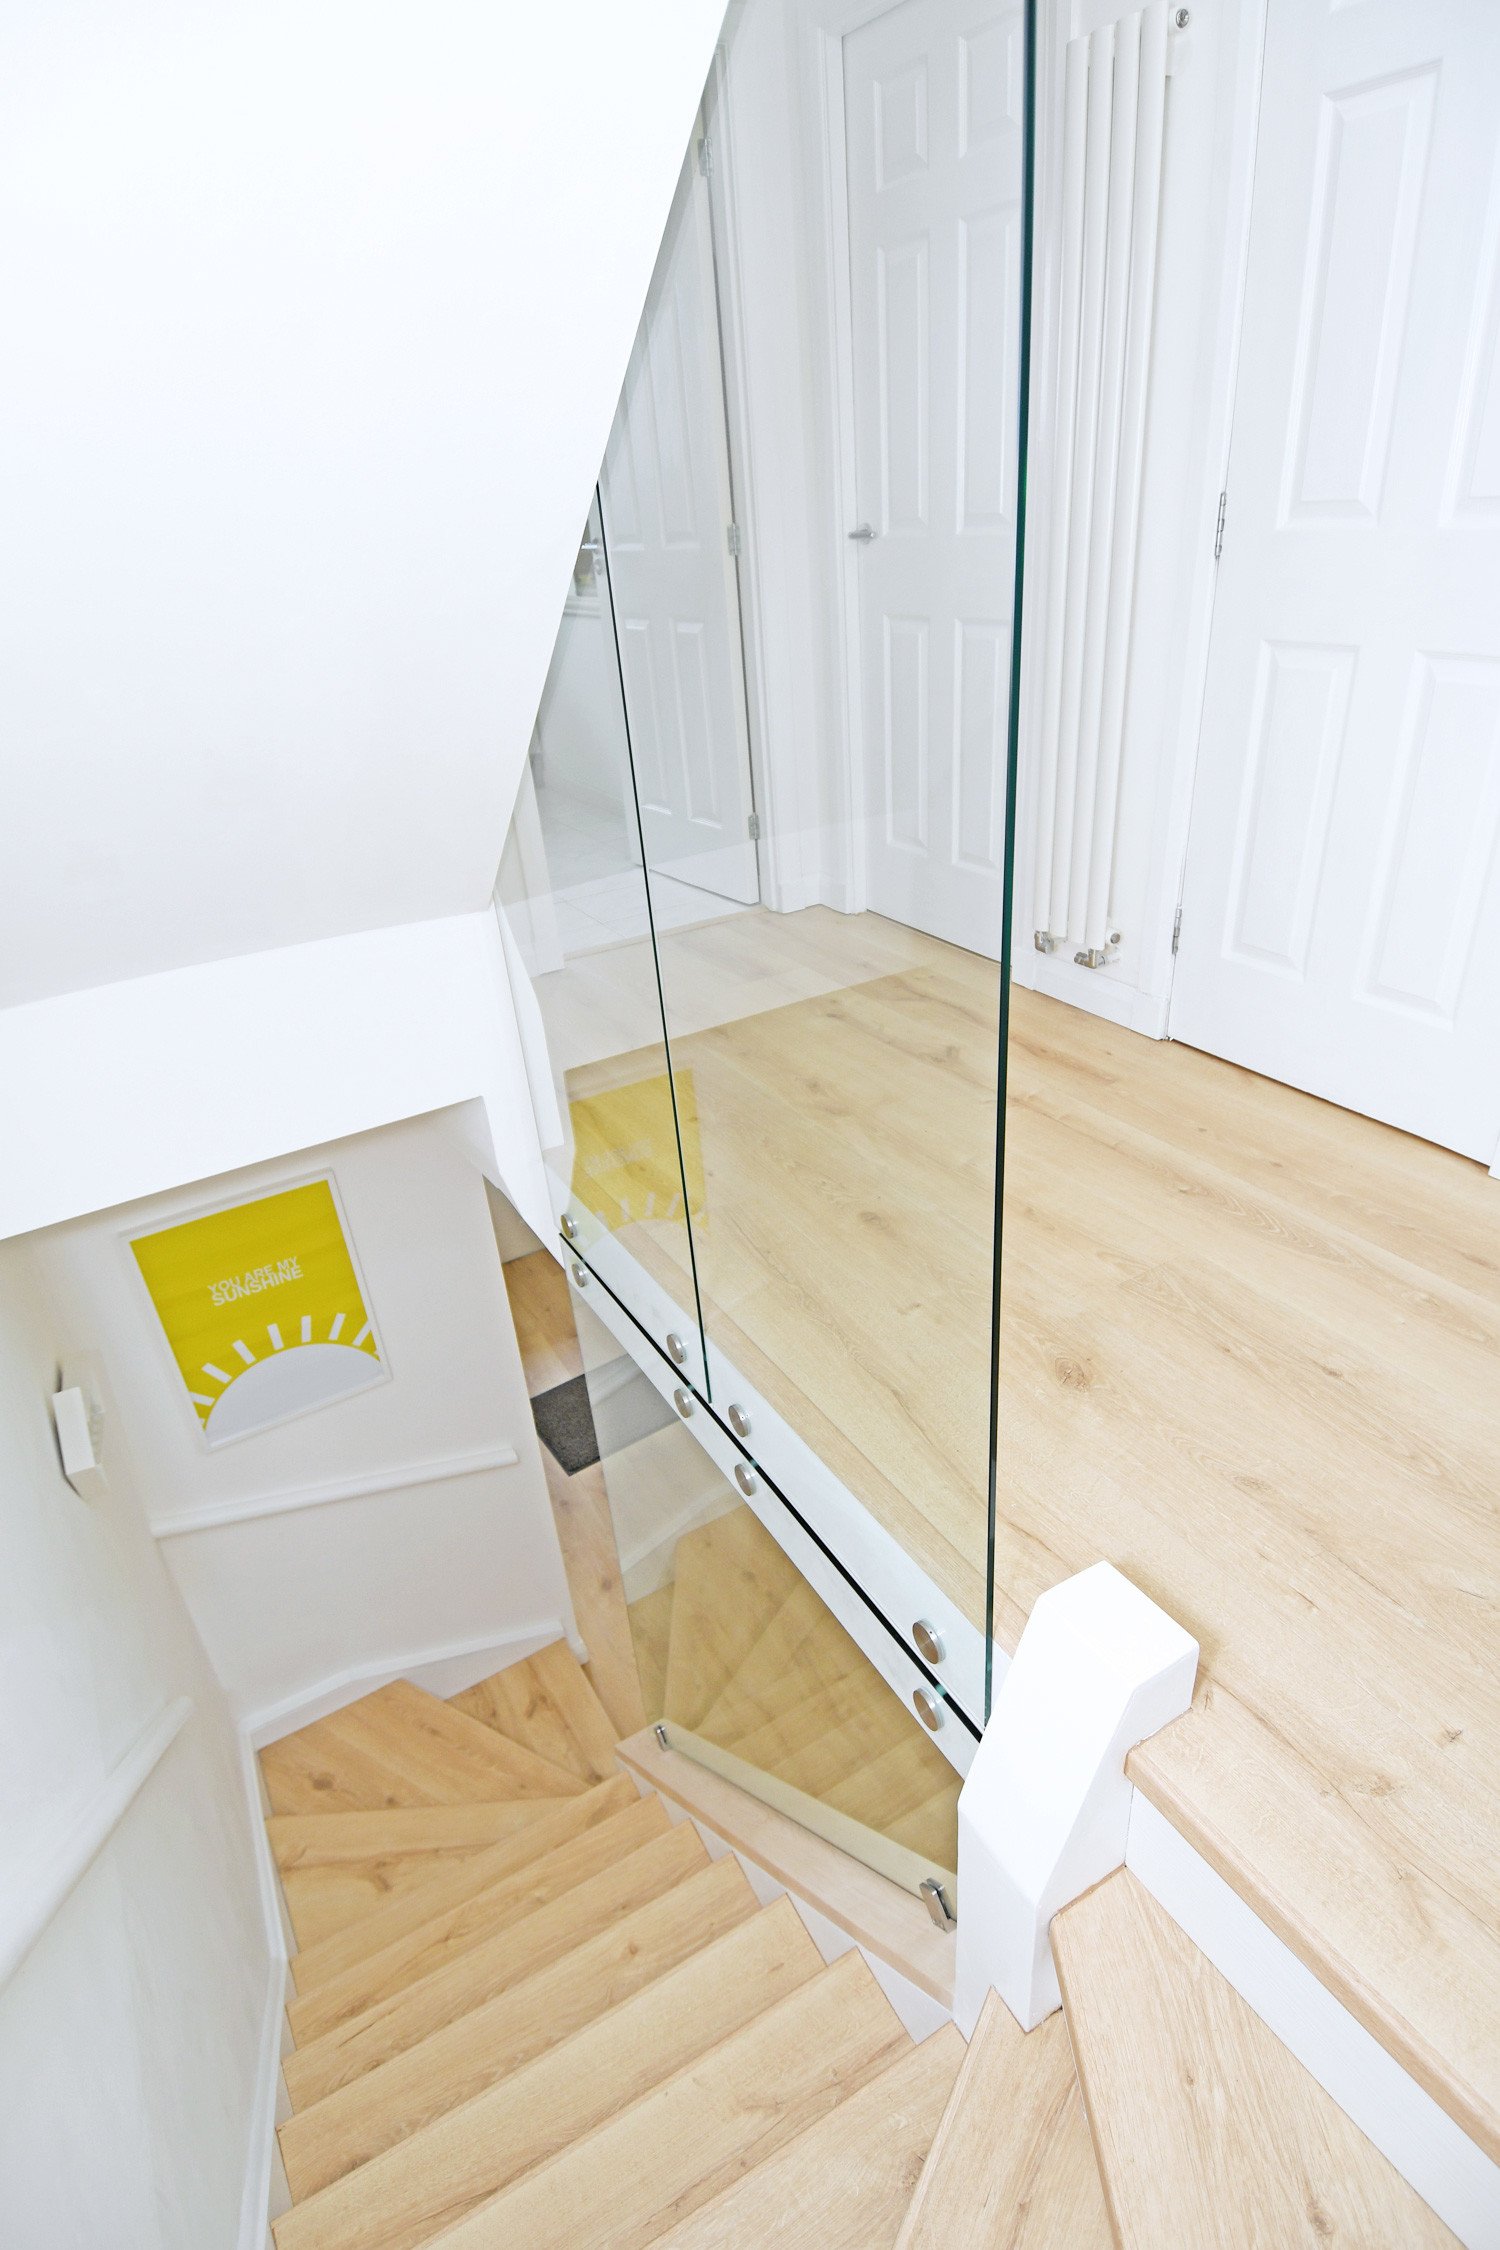
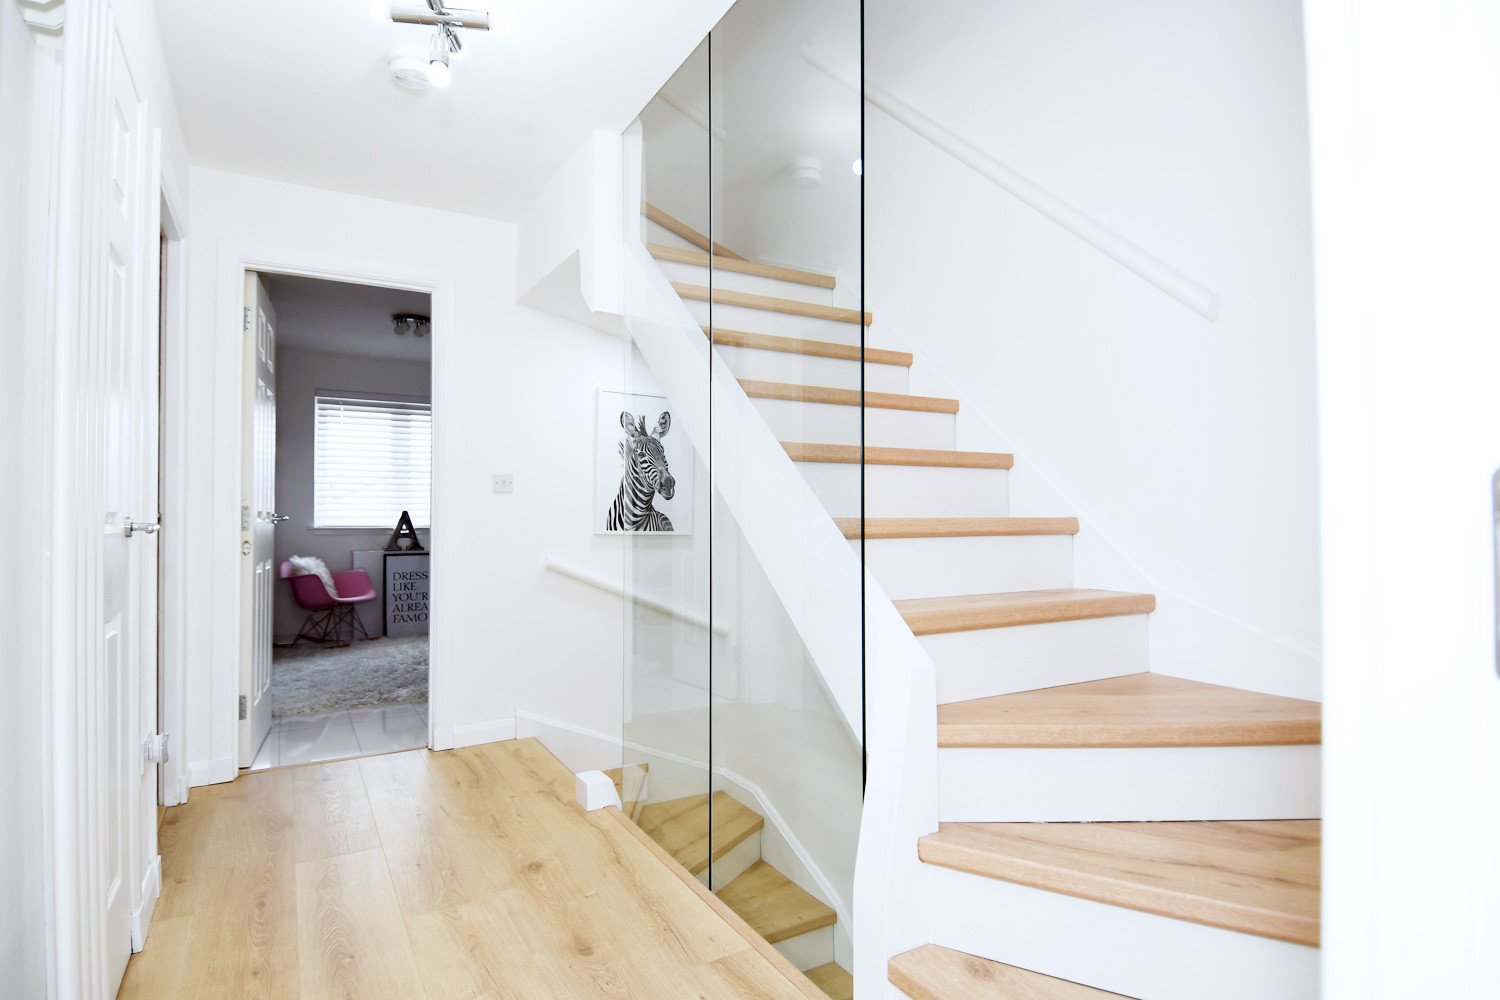
I mean, I say that as if it was some kind of quick, easy decision. If you’ve been reading this blog for a while, though, you’ll know there ARE no quick or easy decisions for us, so, naturally, we agonised over this one for an annoyingly long time. I’d initially been hellbent on having an all-white staircase – purely because I’d seen one on Pinterest, and that was that, basically – but was eventually forced to concede that, although the white flooring we have in two of the bedrooms has proved to be really low-maintenance (Yes, really…), it might not be QUITE as practical for a high-traffic area like the stairs.

Terry, meanwhile, wanted a natural wood floor with white upstands, and he was totally set on that right up until he took up some of the stair carpet, and discovered that the floorboards underneath were the kind of cheap MDF you tend to find in newer houses (No gorgeous floorboards for us, sadly…), and that replacing them with real wood would basically involve taking down the entire staircase. Well, we may have been willing to live without walls for weeks on end (I mean, we weren’t really: we just had no choice…), but there was absolutely no way we were prepared to take down the stairs, so we did a bit of research (And by “we” I obviously mean Terry….), and were happy to discover the Quickstep Incizo system, which allows you to install laminate flooring on stairs.

 
In the end, then, we used the same Quickstep flooring we have throughout the ground floor of the house (This one is Desert Oak Light Natural, from the Majestic range, and it was kindly provided by Quickstep, in exchange for this post) on the treads, and then the same white laminate we have in the bedroom (The appropriately named White Planks) on the risers. Because we’ve used both of these before, we knew they’d be hard wearing, and easy to maintain: what we didn’t realise, however, was that they’d be slightly LESS easy to fit on all 26 stairs, including those tricky, round-the-corner ones. As Terry was having to try to fit this in around his web design work AND childcare duties, it ended up taking approximately 100 years: as the glass for the walls ended up taking at least twice that long, however, it didn’t really matter, so he was able to do a little bit at a time, until we finally had a floor again.
 
The new flooring also replaced the dingy old carpet on the second floor hall, and goes from there up the second set of stairs, to the third floor of the house:
glass-walled stair leading to attic bedroom
upstairs hallway with glass wall on the stair and pale wood floor
As you can see, we’ve also re-purposed some of the prints we used to have in our living room (We replaced them with canvases last year) to use on the stair. These are very much a temporary measure: we need a lot more prints here to brighten the place up, but we’re going to have to acquire those gradually, once we can come to some kind of agreement on what, exactly, we want to put on these walls. Annoyingly enough, while Terry and I have very similar taste on almost every aspect of interior design, the one thing we always really struggle with is choosing artwork. We knew, for instance, that we wanted to put something fairly bold on the very high wall which leads up to the third floor, but every time I found something I liked, Terry said it, “Just didn’t speak to him,” and every time he found something that DID speak to him, it very definitely did NOT speak to ME.
 
In the end, we decided to go for a variation on the Pink Splash from Photowall Sweden (also gifted), which Terry altered himself, to turn it from a horizontal print into a vertical one, to fit the space:
pink splash giant canvas in tall stairwell
We were basically going for a modern art gallery kind of look here: I wanted something really bold and dramatic, but the issue with that was finding something that would fit the slightly awkward space. There just aren’t many canvas stores out there specialising in canvases that are taller than the average room, you know? Luckily, though, Photowall DO actually specialise in this kind of thing, and allow you to create your print in any size you like: it’s then delivered flat-packed, complete with the wooden frame, which you fit the canvas onto yourself. Or, you know, just get Terry to do it.
 
We also bought the pendant light in the stairwell, and the smaller light in the hall, to replace the crappy spotlights which came with the house, and which I’ve hated ever since we moved in. I’m not 100% happy with these, but, unfortunately for me, lighting is one of the other aspects of interior design that we never seem to agree on, so these were a bit of a compromise. (Lighting is also currently my number one bugbear when it comes to our house. When we bought it, every single light was a spotlight, and, as well as adding absolutely nothing to the aesthetics of the house, they’re not great at lighting up rooms, either, as they focus all of their light on a single spot. I really, really want to replace them all, and we’ve been doing it gradually, but I’m still left with 8 lights which need to be replaced, and as lighting is freakishly expensive, we just can’t afford to do it all in one go. Woe!)
 
Which finally brings me to those glass walls: which, yes, our baby totally WILL get covered in handprints, won’t he?
 
(Just because I know I’ll get a lot of comments about this, yes, we did think carefully about the wisdom of having glass walls in the home of a sticky-handed toddler. We decided just to go for it, though, because Max is never allowed onto the stairs or landings unsupervised, so there shouldn’t be too many opportunities for him to touch the glass – er, other than this opportunity right here, obviously – and, of course, he’s not going to be a sticky-handed toddler forever, either. Ultimately, though, we’re aware that it will get marks on it, and we’re just going to have to live with that: I mean, it’s not like I don’t already spend 80% of my time every day cleaning fingerprints off all of the mirrored doors (Which I ALSO hate with a fiery passion, by the way…) and other glass surfaces in the house, after all, so what’s one more surface to clean, really?)
 
(Our friend Keith came round to visit this week, bringing with him a gift of glass cleaner. Our friends know us well…)
 
When we were looking into replacing the stair walls with glass, most of the solutions we found involved waist-high glass panels, with a hand-rail on top. We, however, really wanted a floor-to-ceiling glass wall, to really open up the space, and give it a bit of much needed ‘wow’ factor. To do this, we had to have the glass panels custom made to fit the space, and then fitted by a joiner specialising in glass work. As I mentioned at the start of this post, we found a local company to do this: they normally fit giant mirrors in show homes, or in commercial spaces: this was the largest retro-fitted glass installation they’ve done in a domestic setting, and, because of that, it took quite a bit of time to figure out how best to do it,
 
Again, I’ve made all of that sound much less complicated than it actually was: I know you probably wouldn’t think it to look at the finished result, but it was all pretty complex, and Terry lost quite a bit of sleep to trying to figure out what needed to happen, and when. Then the glass finally arrived… and the holes that had been cut in it were too small for the bolts, so it had to go back and be totally re-done. How we laughed.
 

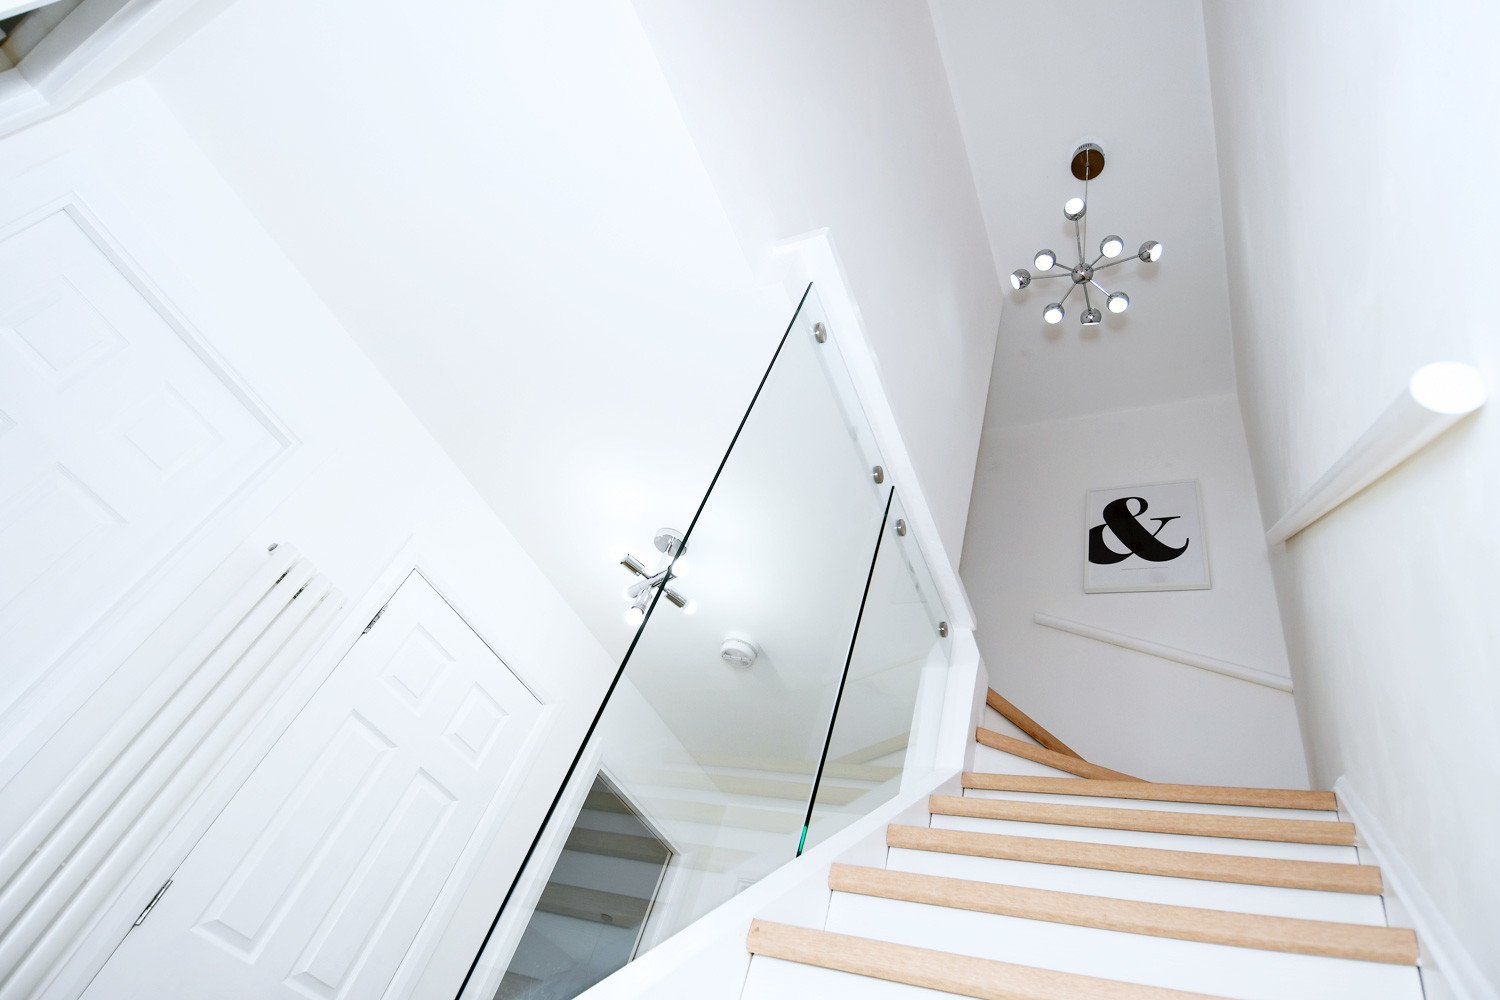
By this point, I’d pretty much given up on the project, and had resigned myself to the fact that we would just have to live in a house without stair walls for the rest of our lives. Last week, though, came some good news: the glazier had managed to rush through the new glass order, AND the joiner was available to fit it. Finally, the stars had aligned, and, four months after we knocked down that first wall, the new ones went up: here are the before and after shots…

West Lothian Plastering expertly done by Nu walls

[images-comparison default_offset_pct=”0.5″ el_css=”” image_1=”125952″ image_2=”125953″]

[images-comparison default_offset_pct=”0.5″ el_css=”” image_1=”125967″ image_2=”125955″]

[images-comparison default_offset_pct=”0.5″ el_css=”” image_1=”125958″ image_2=”125959″]

[images-comparison default_offset_pct=”0.5″ el_css=”” image_1=”125960″ image_2=”125961″]

P.S. If you'd like to hear more from me, please consider subscribing to my newsletter…

books by Amber Eve
COMMENTS
  • Helen

    REPLY

    Absolutely love it!!! Definitely has the WOW factor!

    May 14, 2019
  • Myra

    REPLY

    It looks fab, great choice and great job. We’ll worth the trauma.

    May 14, 2019
  • It looks SO good Amber! A completely different space!
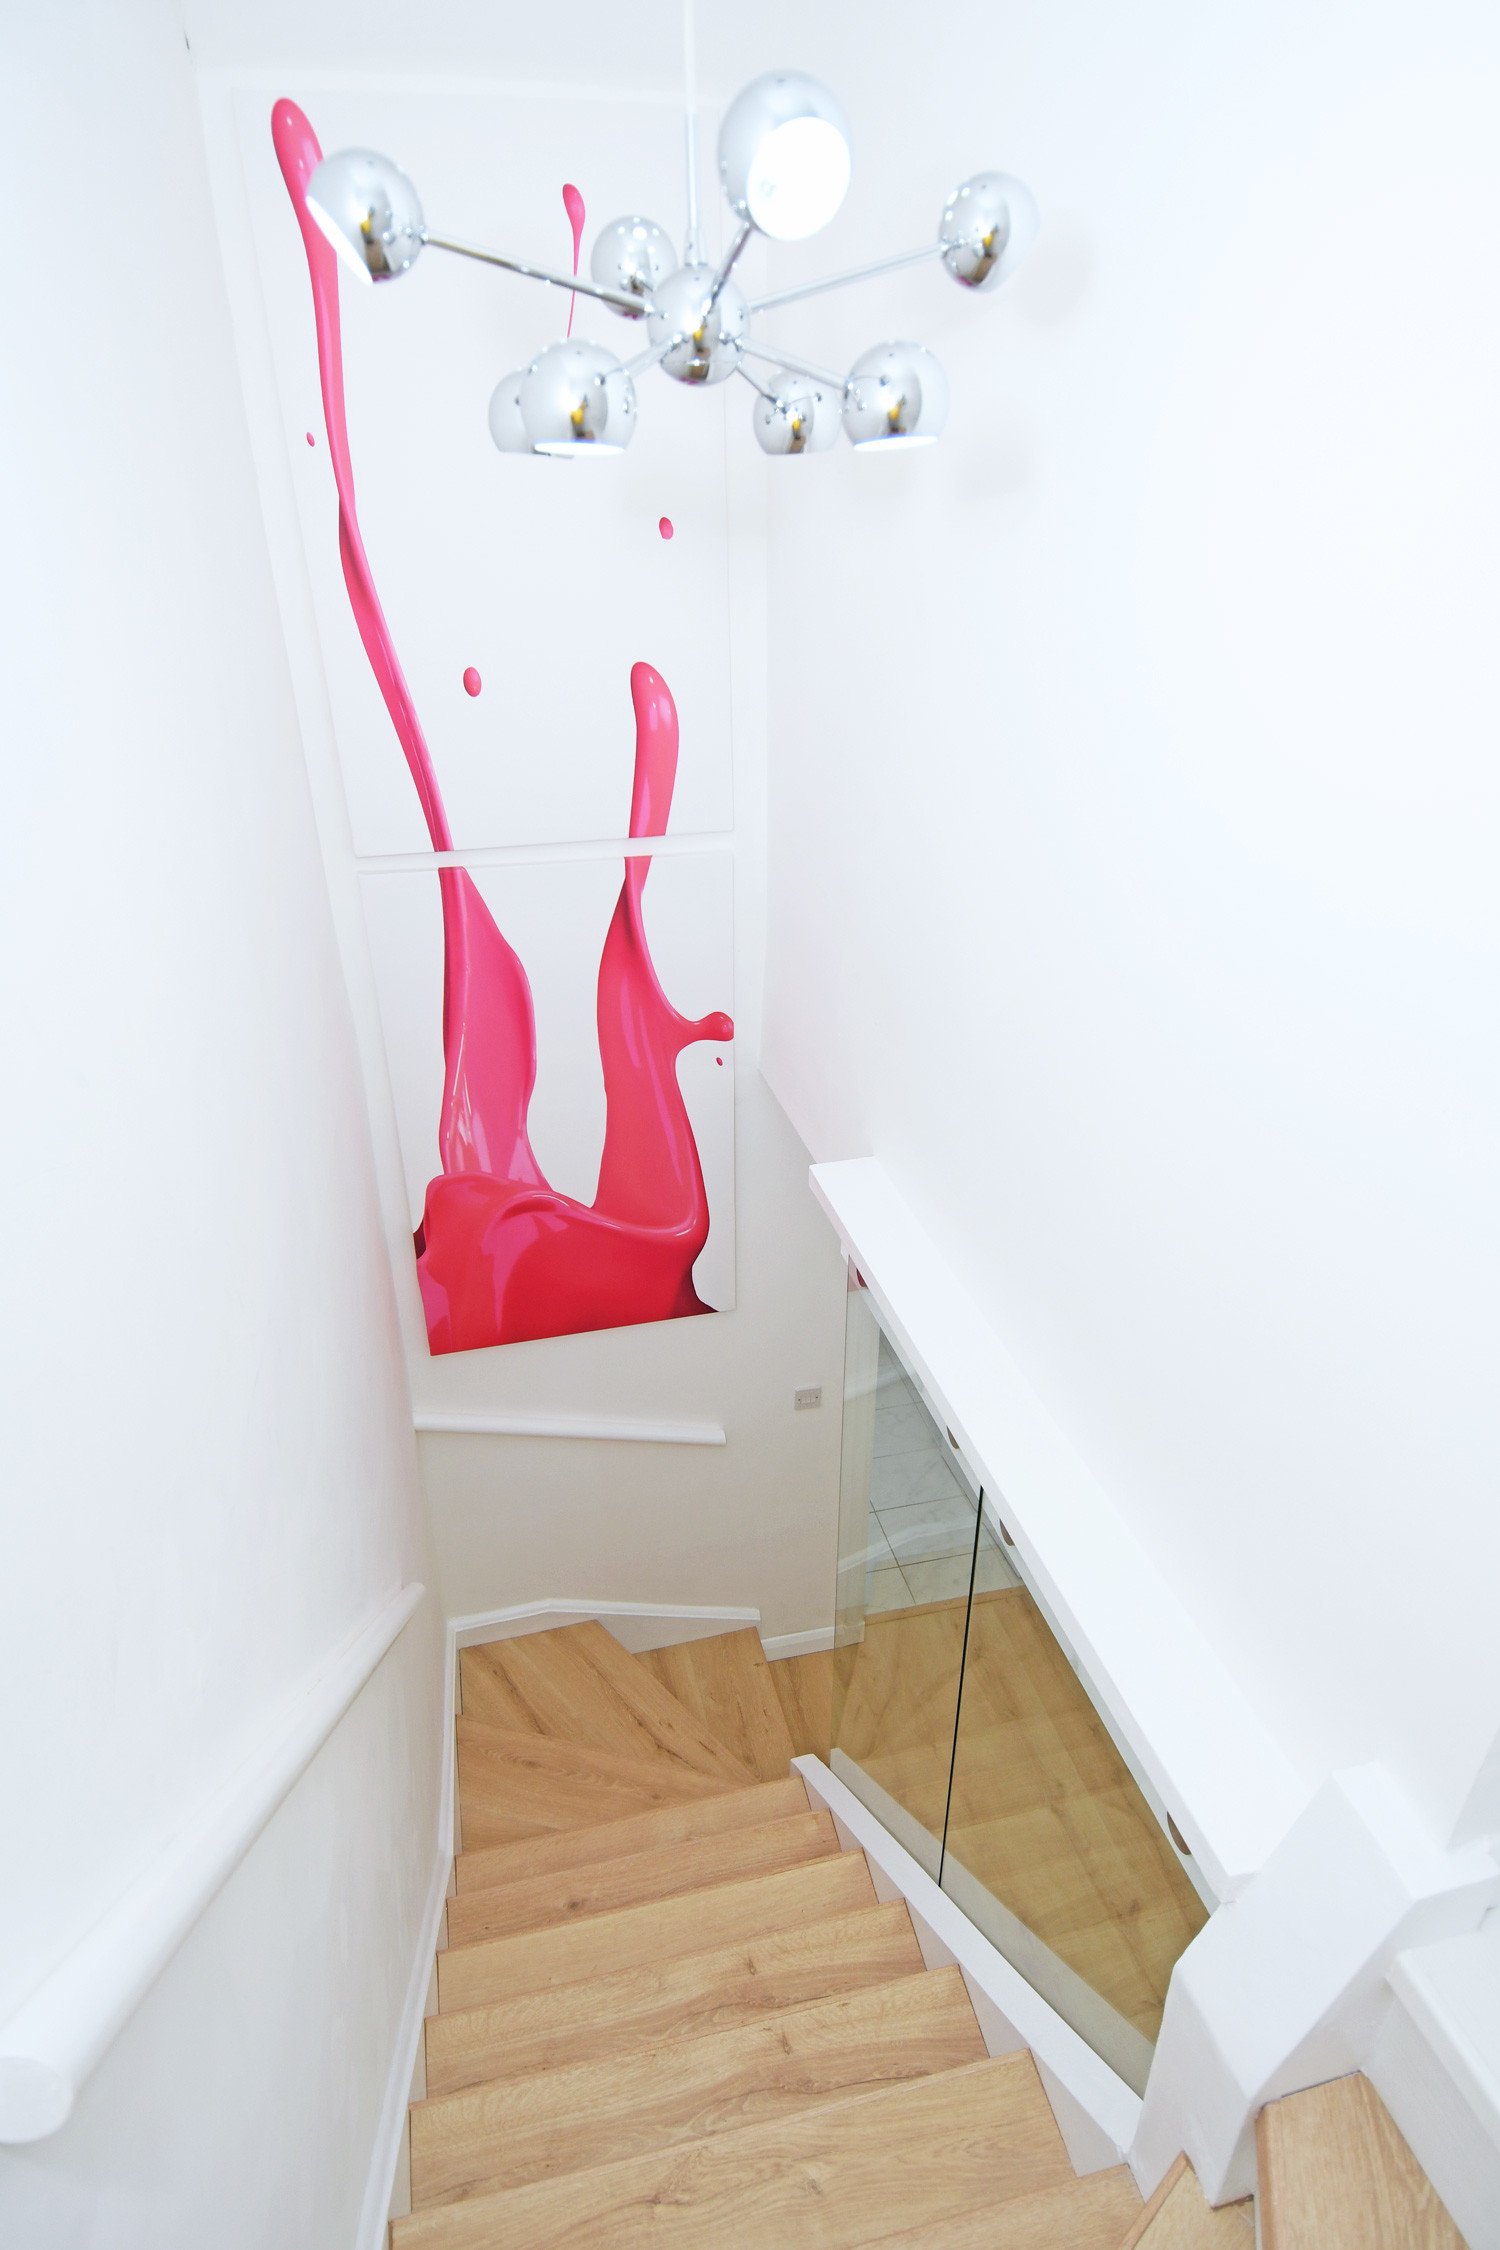
    I love that pink splash artwork, it really captures your eye!

    May 15, 2019
  • Hannah

    REPLY

    Looks amazing!

    Also love the before/after swipe photos, fancy! X

    May 15, 2019
  • Alice

    REPLY

    My daughter’s 2.5 years and we don’t have much of a problem with sticky hands (occasionally, but certainly not all the time) so I wouldn’t worry about that. Even toddlers learn to wash their hands!

    This is really interesting, especially the laminate on stairs. I have wooden floors in my flat but still have the old carpet on the staircase as haven’t worked out what to do to replace it so this is interesting to look into.

    May 15, 2019
  • Mary Katherine Graetz

    REPLY

    The Big Reveal is Worthy for us readers, who’ve been looking forward to it, although reading about the DIY agony has been PRETTY entertaining, I must say. Fantastic job by everyone involved, and what a dramatic difference! Bravo to you and Terry for having the vision for this in the first place, then the persistence and patience it took to bring it across the finish line. Well-done, y’all!

    May 15, 2019
  • Erin

    REPLY

    I love these and they were totally worth the wait! I think… 😉

    May 15, 2019
  • Well worth the wait and the stress – it looks fab!

    May 15, 2019
  • Elen Southgate

    REPLY

    Oh I really wish I hadn’t seen this, I LOVE IT! I am currently in the middle of sanding hell with my bannister, this makes me want to rip the whole thing out and replace it with glass.

    May 17, 2019
  • Wow, what a difference the glass makes! The floor to ceiling panels are unlike anything I’ve seen before and I love them.

    It’s crazy how fingerprints – whether they’re your own or a child’s – manage to print everywhere! Like yourself, I’m forever running round trying to wipe all glass surfaces down to get rid of them.

    Looking forward to seeing more of your content, you’ve found yourself a subscriber!

    Best wishes,

    Emma at Ironmongery Experts

    May 20, 2019
  • This stair renovation is amazing, it has really opened up the home and let so much light in, we need something like this done in our place as the stairs are so dark. Great job, anymore DIYs coming up?

    June 6, 2019
POST A COMMENT